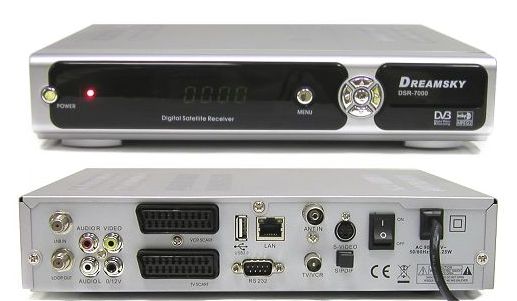
Úplne najlepšie riešenie je použiť na update / aj zálohu / USB kľúč. Komunikácia je rýchla a bezpečná a čo je najlepšie - je intuitívna a preto ju zatiaľ do podrobna opisovať nebudem. Základná a preložená časť sa venuje komunikácii cez RS-232
======================
1.Ako nahrať s/w s PC?
======================
1) Na prepojenie použi krížený kábel s zapojením 5-5,2-3,3-2

2) Vypnutý prijímač z el. siete prepoj týmto káblom s PC
3) Zapoj prijímač do el. siete uveď ho do Stand By režimu
4) Rozklikaj ikonku Upgrade / utilitka na Upgrade je pri každom fw/
5) Nastav Com port podľa toho , ktorý máš v PC káblom pripojený (ak používaš redukciu USB-RS232 klikni na túto možnosť )
6) Klikni na Open a nájdi vo svojom PC extrahovaný fw, ktorý má označenie rom
7) Klikni na štart
8) Počkaj na prenos. Po ukončení bude na displayi nápis " End"
=========================================
2.Ako povoliť emulátor?
=========================================
Menu-->Nastavení STB-->MUTE-->999 /tak sa aj vypína/
=======================
3.Ako upraviť manuálne kľúče?
=======================
Po povolení emulátora stlač Menu--->Nastavení STB-->Manual Key
======================
4.Ako aktualizovať softcam keys s PC cez RS-232?
======================
1) Stiahni si softcam http://www.satpodpora.sk/forum/viewtopi ... 1600#p1600.
2) Prepoj prijímač s PC RS232C káblom(pin-2 to pin-3,pin-3 to pin-2,pin-5 to pin-5)..
3) Zapoj prijímač do el. siete uveď ho do Stand By režimu.
4)Nastav Com port podľa toho , ktorý máš v PC káblom pripojený (ak používaš redukciu USB-RS232 klikni na túto možnosť )
5) V Updateri vyber možnosť <Download Key>,klikni <Open> a vyber softcam.key file,potom klikni <Start>, a prebehne prenos.
6) Počkaj na prenos. Po ukončení bude na displayi nápis " End"
============================
5.How to update Box to Box?
============================
a)Prepare a twisted RS232C cable(pin-2 to pin-3,pin-3 to pin-2,pin-5 to pin-5).
b)Connect the master receiver and the slave receiver with twisted RS-232C cable.
c)Turn on the master receiver and press "POWER" key to make it standby.
d)Turn on the slave receiver to begin update.
e)The LED of the master receiver will display "H" and blink it
f)Input the the password:(Only the first time)
111: To update S/W.
222: Channel Data
333: Channel Data first, then S/W
444: Copy Whole Flash except BootLoader
g)During the updating,the LED of the slave receiver will display "dxxx"(Receive the data to the SDRAM),"-ES-"(Erase the flash),then "Pxxx"(Put the date to the flash),at last it will display "-End"
h)Tune off the slave receiver,disconnect RS-232C cable and restart it
i)If you want to update another receiver,replace it with another receiver and turn on the receiver,it will start without inputting password.
=================================
6.How to upload the Channel Data?
=================================
a)Prepare a twisted RS232C cable(pin-2 to pin-3,pin-3 to pin-2,pin-5 to pin-5).
b)Connect your PC and receiver with twisted RS-232C cable.For safety,you should switch off the computer and the receiver before connection.
c)Turn on the receiver and press "POWER" key to make it standby
d)Run the upgrade tool on your PC, and config your correct COM.
e)Slect the <Upload Data>,then click <Start>,upload will begin.
f)During the uploading,the LED will display "Uxxx"(Upload the data to PC),at last it will display "-End".
g)After uploading,it will generate a file(*.SDX) on the same directry of the update tool[Upgrade],the path name will display on the File Status. This file includes all the satellites, transponders ,channels and settings.
======================
7. Hot Keys
======================
PGUP: All ECM List
PGDN: Current Key
INFO+2: RS232 Mode List
======================
8. Ethernet Sharing
======================
a) After factory default, Enable Patch. and make sure the RS45 small board embeded.
b) Searching channels.
c) Press INFO+2: and Select Ethernet CSC
d) Go to Main Menu-->Timer Setup-->IP Setting
In this menu, you can set the IP Address etc..., if the IP-Address is 0.0.0.0. It will get the IP automatically.
e) Go to Main Menu-->Timer Setup-->Server Setting.
In this menu, you can input the server by manul. After input the server, it will automally login the server and display
the server information at the bottom.
==============================
9.Loading G-Boy Game's Via USB
==============================
Download G-Boy Games from internet (G-Boy, extension (.gb, .gbc)
Play Game's Available Keys:
1) UP/DOWN/LEFT/RIGHT
2) 0/1/2
3) OK/EXIT
4) AUDIO
==============================
10. Change Start-up/Radio Logo
==============================
Note: It will replace the default logo.
10.1 -- Capture Pause Picture as Start-up/Radio Logo
1) Press "PAUSE" to pause the picture
a) Start-up Logo
b) Radio Logo
c) Cancel
Select a or b and wait some seconds for the converting.
10.2 -- Convert BMP/JPEG via USB as Start-up/Radio Logo
1) Play BMP/JPEG via USB
2) Press F1 key to save it as Start-up Logo or Radio Logo
POZOR-TÚTO FUNKCIU POUŽÍVAJTE LEN S FW 1.99 A VYŠŠÍM !!!

